Enterprise API integration guide
We provide most of the reports that are present in our dashboard as APIs which can be integrated into your own system/Business Intelligence tools or some other Dashboards/systems, which will provide insights and help track progress on your own system.
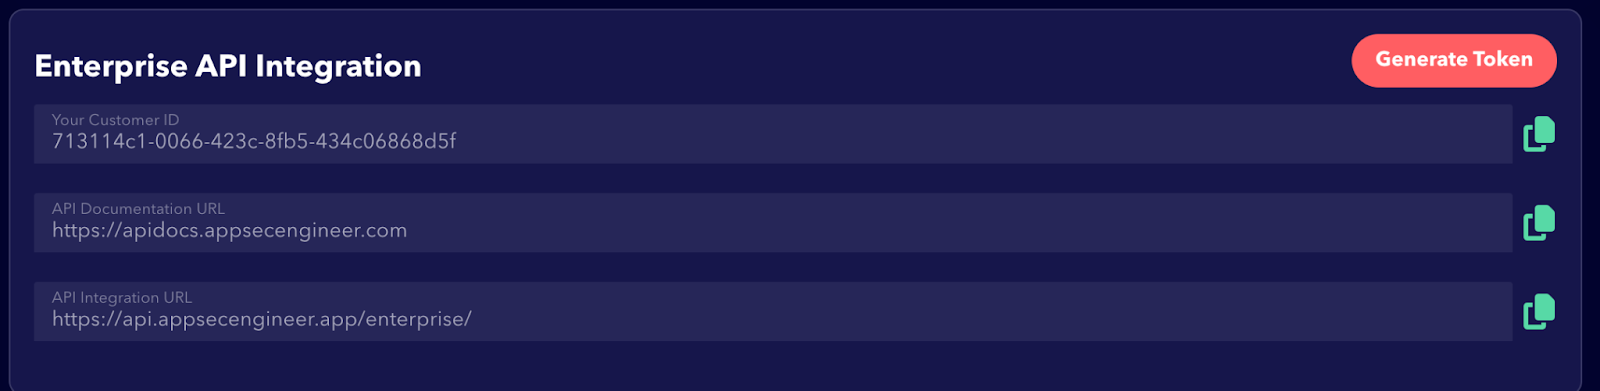
Find the API Documentations on the url:
https://apidocs.appsecengineer.com
Steps:
Generating API keys
These APIs are authorized using api keys which can be generated from the AppSecEngineer Admin section. Login into AppSecEngineer Portal, go to Admin → Integrations → Enterprise apis
You’ll find the api url and a button to generate api secret. Generate the api secret and note it.
Review Api docs
We provide different types of reports such as reporting categorized by learning paths, per user reporting, learning journeys reports etc. Carefully check the payload, http method and api path.
The required headers and other attributes are also documented in the api docs guide.
Example code in python:
import requests
api_url = "https://api.appsecengineer.app/enterprise/report/proficiency-report"
headers = {
"X-ASE-API-Token": "<secret api key>",
"X-ASE-Customer-ID": "<customer id shown in dashboard>",
"Content-Type": "application/json",
}
body = {}
try:
response = requests.post(api_url, json=body, headers=headers)
if response.status_code == 200:
print("Request successful!")
print("Response:", response.json())
else:
print(f"Request failed with status code: {response.status_code}")
print("Response:", response.text)
except requests.exceptions.RequestException as e:
print("An error occurred:", e)
We only support JSON data as request and response
The response can be transformed into csv/sheet/pdf etc using your own system if needed. Or it can be directly represented in the BI tools.
Process and Clean the Data
Objective: Prepare the retrieved data for reporting by extracting, cleaning, and organizing it
Parse the JSON response and extract relevant fields.
Format the data (e.g., clean dates, remove unnecessary fields).
Structure the data into a consistent format for report generation.
Example Python:
cleaned_data = [ ]
for item in data['results']:
cleaned_data.append({
'date': item['date'],
'sales': item['sales'],
'transactions': item['transactions']
})
Generate the Report
Objective: Create a professional report in the desired format (e.g., CSV, Excel, PDF, or HTML)
Options for Report Generation:
CSV Format (Using csv Library):
import csv
keys = cleaned_data[0].keys()
with open('report.csv', mode='w', newline='') as file:
writer = csv.DictWriter(file, fieldnames=keys)
writer.writeheader()
writer.writerows(cleaned_data)
Excel Format (Using pandas):
import pandas as pd
df = pd.DataFrame(cleaned_data)
df.to_excel('report.xlsx', index=False)
HTML Format: Generate web-friendly reports using HTML tables or templates.
Step 6: Automate Report Generation (Optional)
Objective: Schedule automated report generation for regular intervals (e.g., daily, weekly, monthly)
Automation Methods:
Linux Cron Jobs: Automate the execution of the script at specific intervals.
Example:
crontab -e 0 0 * * * python3 /path/to/report_script.py # Run at midnight daily
Windows Task Scheduler: Schedule scripts to run on Windows systems.
Cloud Services: Use tools like AWS Lambda or Google Cloud Functions for serverless automation.
Step 7: Distribute the Report
Objective: Share the generated report with stakeholders or automate the distribution process.
Options for Distribution:
Email: Use email services to send the report automatically.
Example (Python with smtplib):
import smtplib from email.mime.multipart import MIMEMultipart from email.mime.base import MIMEBase from email import encoders sender_email = "your_email@example.com" receiver_email = "receiver@example.com" password = "your_email_password" msg = MIMEMultipart() msg['From'] = sender_email msg['To'] = receiver_email msg['Subject'] = "Monthly Sales Report" attachment = MIMEBase('application', 'octet-stream') with open('report.csv', 'rb') as file: attachment.set_payload(file.read()) encoders.encode_base64(attachment) attachment.add_header('Content-Disposition', 'attachment', filename='report.csv') msg.attach(attachment) with smtplib.SMTP('smtp.example.com', 587) as server: server.starttls() server.login(sender_email, password) server.sendmail(sender_email, receiver_email, msg.as_string())
Cloud Storage: Upload the report to platforms like Google Drive or AWS S3 and share access links.
Step 8: Monitor and Improve
Objective: Continuously optimize the report generation process.
Feedback Collection: Gather input from stakeholders on the report’s accuracy, relevance, and design.
Improvements: Refine parameters, enhance formatting, and address any data inconsistencies.
Error Handling: Implement error logging and handling to ensure reliability
Track learning journey results through our guide on Reports about Learning Journeys
Summary of Steps
Select API: Identify the appropriate API for retrieving the required data.
Authenticate: Set up secure access using API keys or OAuth tokens.
Fetch Data: Retrieve data using well-configured API requests.
Process Data: Clean and organize the data for analysis and reporting.
Generate Report: Create reports in desired formats (CSV, Excel, PDF, HTML).
Automate: Schedule recurring report generation using automation tools.
Distribute: Share reports via email or upload them to cloud storage platforms.
Monitor & Improve: Continuously test and enhance the process for reliability and usability
Related Articles
Integrate LTIAAS
Prerequisites: An active enterprise plan with AppSecEngineer Access to moodle with same email address as registered admin on ASE platform Note: There is no data synchronization LTI 1.3 Integration: Allows enterprises to pull training content ...SCIM Integration Guide
Login into Azure Portal, Find and go to Microsoft Entra ID service Click on Enterprise Application → New Application → Create Your Own application Name the application something recognizable such as AppSecEngineer-SCIM, select the Non-gallery option ...Setting up your Enterprise Account
Before getting started with setting up your enterprise account, make sure you’re logged in. If you’re unsure how to log in, refer to our Logging in to AppSecEngineer guide. 1. Creating an Admin Account Once you have received an email about your ...Quick start guide for Enterprise
Set up Enterprise Account Import users manually SSO integration Create team and assign courses Available reportsMoodle Integration
Step 1: Log in to Moodle Sign in to your Moodle account. Screenshot of the Sandbox 4.5 platform's top navigation bar with options for Home, Dashboard, My Courses, and Site Administration. Click on Site Administration in the top menu bar. Screenshot ...